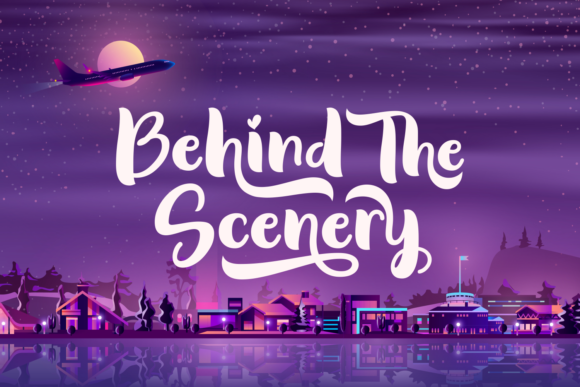
Behind the Scenery Font: A Web Designer’s Layout Review
I was recently redesigning a landing page for a creative coaching client who wanted her site to feel less corporate and more like a warm, handwritten note from a friend. The challenge with these projects is always balance; we need that organic, human touch without sacrificing the clean usability required for high-converting web design. I decided to test Behind the Scenery in the hero section of her homepage to see if it could bridge the gap between whimsical charm and digital functionality. As I dropped the typeface into my Figma file and adjusted the tracking over a soft-focus background image, it became immediately clear that this wasn't just another decorative script. It has a specific visual rhythm that demands attention but remains surprisingly legible on screen.
In the world of UI design, finding a handwritten font that doesn't look messy or pixelated at standard web sizes is rare. Behind the Scenery brings a cute, whimsical twist that feels authentic rather than manufactured. When used as a display font for primary headlines, it adds an instant layer of personality that stock photography simply cannot achieve. However, integrating this typeface into a responsive layout requires intention. It is not a set-it-and-forget-it solution; it is a deliberate design choice that shapes how users perceive the brand identity from the moment the page loads.
Elevating Hero Sections and Digital Brand Identity
The true strength of Behind the Scenery lies in its ability to serve as a focal point in web design. During my testing on the coaching portfolio site, I used the font for the main value proposition above the fold. Because the letterforms have a natural bounce and varied baseline, they create a dynamic visual texture that breaks up the rigid grid of modern website layouts. This is particularly effective for creative entrepreneurs, boutique online stores, and lifestyle brands where emotional connection is just as important as information architecture.
When designing for digital brand experiences, typography does heavy lifting. A sterile sans serif might communicate efficiency, but Behind the Scenery communicates approachability. I found it worked exceptionally well when paired with ample whitespace. Crowding this font kills its vibe; it needs room to breathe to maintain its premium feel. On the course sales page I was working on, using this typeface for section headers like "What You Will Learn" or "Client Love" helped guide the user's eye through the content hierarchy while maintaining a consistent, friendly tone throughout the scroll.
- Hero Headlines: Ideal for 3-5 word statements where impact matters more than density.
- Signature Elements: Perfect for digital signatures, author bios, or personal welcome notes.
- Pull Quotes: Adds emphasis to testimonials without looking like standard block quotes.
- Navigation Accents: Can be used sparingly in menu items for boutique sites, though caution is advised.
Responsive Readability and Mobile Performance
A beautiful font on a desktop mockup means nothing if it fails on a smartphone. This is where many script fonts fall apart, but Behind the Scenery holds up reasonably well provided you respect its limitations. In my responsive testing, I noticed that the intricate details of the glyphs remain crisp even on high-density mobile screens, assuming you are serving proper webfont formats like WOFF2. However, scale is everything. On mobile viewports, I had to increase the base size significantly compared to my body text to ensure the swashes didn't become illegible artifacts.
Contrast is another critical factor for UX. When placing Behind the Scenery over image banners or colored backgrounds, accessibility must be prioritized. The varying stroke width inherent in this creative font means that thin parts of the letters can disappear against busy backgrounds. I recommend using a solid color overlay or a subtle drop shadow to ensure WCAG compliance. For a dark-mode version of the site, I found that increasing the letter spacing slightly improved readability, preventing the characters from feeling too tight when backlit. Always preview your typography choices on actual devices, not just browser resizing tools, to catch these nuances before launch.
Strategic Font Pairing for Web Interfaces
Behind the Scenery is a star performer, but it needs a supporting cast. Because it carries so much visual weight and personality, pairing it with another decorative typeface usually results in a chaotic interface. In my project, I anchored it with a clean, geometric sans serif font for all body copy, buttons, and navigation links. This contrast creates a professional framework that allows the whimsy of Behind the Scenery to shine without compromising usability.
For clients wanting a more editorial or traditional aesthetic, a simple serif font also pairs beautifully, evoking a sense of modern nostalgia. The key is to let Behind the Scenery handle the emotional hooks while your secondary typeface handles the functional communication. Never use this font for long-form blog posts, dense pricing tables, form labels, or footer links. Those areas require maximum scannability and cognitive ease. Reserve Behind the Scenery for moments where you want the user to pause, feel, and engage emotionally with the content.
Technical Considerations for Digital Product Creators
If you are building digital templates, selling printables, or creating assets for other creators, understanding the technical scope of this font is vital. Before committing Behind the Scenery to a commercial web project or digital product, verify the licensing terms. Webfont licenses often differ from desktop licenses, and using a font in a template for resale usually requires a specific commercial tier. Additionally, check for multilingual support if your audience is global; missing glyphs for accented characters can break the immersive experience for non-English speakers.
For those using this font in SVG-based designs for platforms like Cricut or Silhouette, or for vector graphics on websites, pay attention to the node structure. While primarily reviewed here for web, the clean lines translate well to digital cut files for merchandise mockups displayed on e-commerce sites. Just remember that what works as a massive header on a laptop screen might be too delicate for a tiny favicon or a 12px caption. Use Behind the Scenery as a strategic tool for emphasis and branding, and your digital products will stand out with both style and substance.
Ultimately, Behind the Scenery is a delightful addition to the Script Amp category for designers who refuse to choose between personality and professionalism. It transforms generic layouts into branded experiences, turning standard web pages into digital environments that feel curated and human. Whether you are refreshing a portfolio, launching a new course, or updating a shop banner, this typeface offers the warmth of handwriting with the polish required for modern digital interfaces. Test it, pair it wisely, and watch how it changes the way visitors connect with your content.